I've recently been into mason jars and came up with the unoriginal idea of baking mini cakes in them. I wish I could say I thought of this fabulous and easy DIY project myself, but I got my inspiration, as always, from Pinterest. I'd totally do this for my classroom but transferring 27 of them would be a pain in the buTt, so I made them as desserts for my boyfriend and I a week or so ago. Before you start, you need to make sure you have a few things ready.
Materials:
Materials:
6 1/2 pint mason jars
1 Sharpie
1 white cake mix (for 6 jars)
orange + green food coloring
1 pack of gauze (mummy)
4 pairs of sticky googly eyes
frosting (either homemade or store bought)
1 spoon or piping bags (Ziploc bag can be used as a replacement)
1 Sharpie
1 white cake mix (for 6 jars)
orange + green food coloring
1 pack of gauze (mummy)
4 pairs of sticky googly eyes
frosting (either homemade or store bought)
1 spoon or piping bags (Ziploc bag can be used as a replacement)
How To:
Step 1 First thing's first - make the cake! Once done, divide the cake batter evenly among three bowls. Add drops of orange in one and green in the other, while leaving one white for the mummy. Add however many drops you desire, but I suggest only 3 at first, mixing, and then going from there. I wanted more of a lighter green so I only added 4 drops of green food coloring. For the pumpkin, I had to play around with red and yellow food coloring to get orange. I can't remember how many drops of each but you need more yellow drops to get an orange color. [Tip: Pre-heat the oven to 350 degress while you do this]
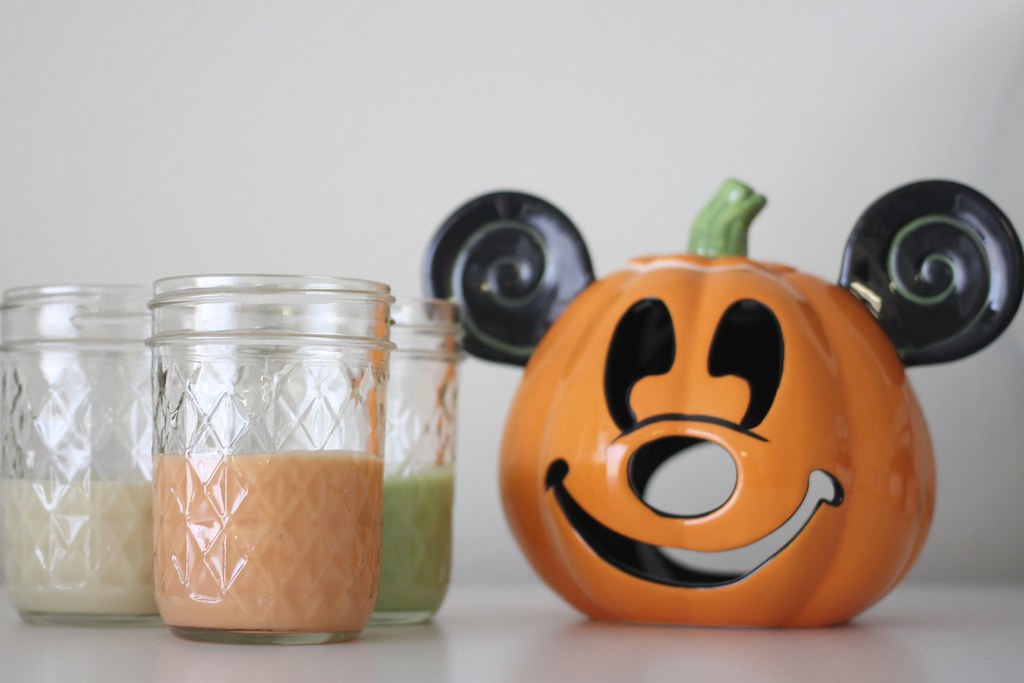
Step 2 Pour cake batter into the jars. I poured batter in until it hit about halfway mark. [Tip: See first picture for reference] Don't pour more than that or it'll rise too high and you'll have to cut off the top.
Step 3 Place the jars on any surface that is oven compatible. Bake for about 20 minutes. Make sure to keep checking on your little monsters! As you can see, Frankie got a bit a slight....sunburn. Keep constant watch so the little creatures don't burn.
Step 4 Let the monsters cool off! I'd recommend 30 minutes just to be safe.
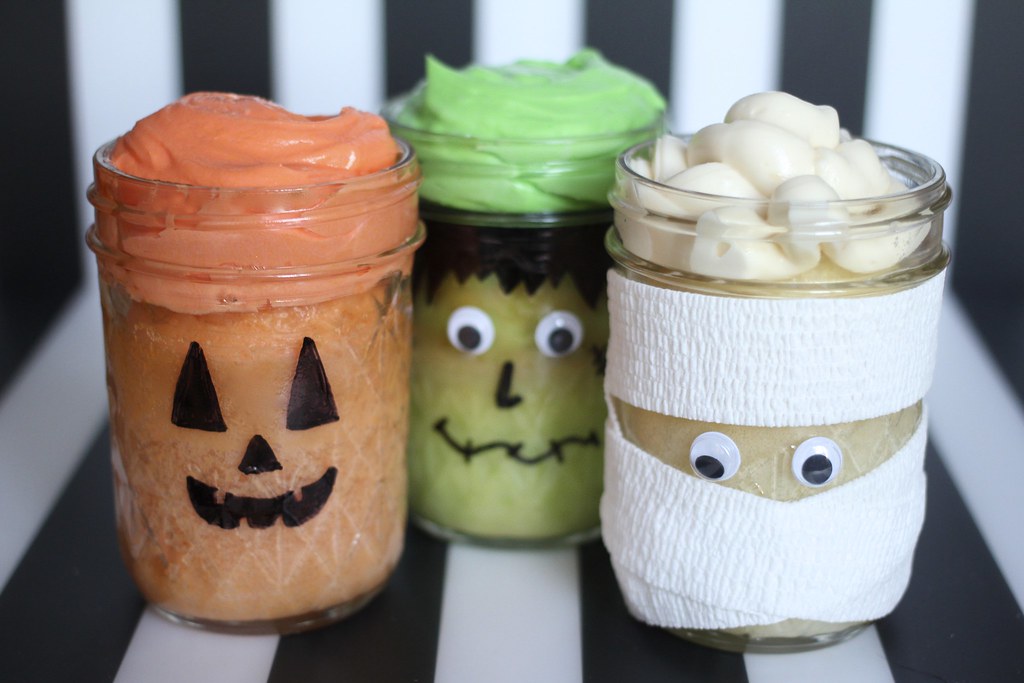
Step 5 Once completely cool, decorate the jars! I've got a thing for mummies lately, so I had gauze already at hand to wrap around the jar. The pumpkin and Frankenstein were the easiest and fastest to do. If you have more time, I'd recommend trying these spooky characters out: bat, vampire, and witch. For the bat, you would need black food coloring, black construction paper for wings, and a glue gun to glue the wings on. For the vampire, you can dye the cake batter purple or a light blue and add a small cape or draw it out. It'd be fun to add some red glitter as a drop of blood underneath his fangs. The witch can be purple or green, or any color you want really! You can add details, like hair, a big nose, or warts, with the Sharpie pen. You could also use piping bags to make the black frosting spiral up like a witch's hate. As you can tell, you can get pretty creative with these! But before you move onto frosting, wait until all ink or glue are dry.
Step 6 Add frosting! I added homemade frosting but any frosting will work.
Step 7 Admire and enjoy! Or seal it up, store in the fridge, and enjoy for the next 2-3 days.
Step 1 First thing's first - make the cake! Once done, divide the cake batter evenly among three bowls. Add drops of orange in one and green in the other, while leaving one white for the mummy. Add however many drops you desire, but I suggest only 3 at first, mixing, and then going from there. I wanted more of a lighter green so I only added 4 drops of green food coloring. For the pumpkin, I had to play around with red and yellow food coloring to get orange. I can't remember how many drops of each but you need more yellow drops to get an orange color. [Tip: Pre-heat the oven to 350 degress while you do this]
Step 2 Pour cake batter into the jars. I poured batter in until it hit about halfway mark. [Tip: See first picture for reference] Don't pour more than that or it'll rise too high and you'll have to cut off the top.
Step 3 Place the jars on any surface that is oven compatible. Bake for about 20 minutes. Make sure to keep checking on your little monsters! As you can see, Frankie got a bit a slight....sunburn. Keep constant watch so the little creatures don't burn.
Step 4 Let the monsters cool off! I'd recommend 30 minutes just to be safe.
Step 5 Once completely cool, decorate the jars! I've got a thing for mummies lately, so I had gauze already at hand to wrap around the jar. The pumpkin and Frankenstein were the easiest and fastest to do. If you have more time, I'd recommend trying these spooky characters out: bat, vampire, and witch. For the bat, you would need black food coloring, black construction paper for wings, and a glue gun to glue the wings on. For the vampire, you can dye the cake batter purple or a light blue and add a small cape or draw it out. It'd be fun to add some red glitter as a drop of blood underneath his fangs. The witch can be purple or green, or any color you want really! You can add details, like hair, a big nose, or warts, with the Sharpie pen. You could also use piping bags to make the black frosting spiral up like a witch's hate. As you can tell, you can get pretty creative with these! But before you move onto frosting, wait until all ink or glue are dry.
Step 6 Add frosting! I added homemade frosting but any frosting will work.
Step 7 Admire and enjoy! Or seal it up, store in the fridge, and enjoy for the next 2-3 days.
As you can probably tell, I'm no world class baker/dessert decorator. But these are how your mini mason jar cakes will turn out like if you're an average skilled person, like me, looking for fun Halloween crafts and activities.
Love,
Jessie
Omg these look so yummy! Definitely gonna try this out for Halloween! :)
ReplyDelete